Saturday 17 December 2011

Last Post

I wanted to divide my college and university work and so I created another blog.......Yeay


http://mastahelix.blogspot.com/

This blog is just for feedback, as my current one had to much text, this one I try to keep simple, sort of.

Friday 30 September 2011

Back to Basics


So to get back into the whole 3D creation, I was tasked with making a simple but working animation of a rocket ship. Well, being at uni now I don't have much time to blog, not like I was dedicated any time before, but a more valid excuse than just being plan lazy.

This is the original version, as I didn't have enough time to render a more complex one, as I'm still using the same crappy laptop, even after receiving 1800 English pounds from student finance, if only I didn't need to consume food.


Another go at the same thing this time, with solid block colour textures, how nice of me to come this far, with only TWO YEARS of supposed experience with the software........worst thing is I tried.

Sunday 21 August 2011

Random Spam

Hello there,
Now to be honest this post doesn't really contain anything interesting, I just felt that if I don't post at least 1 thing a month the world will end, much like it nearly did a few months ago.

Well I tried to create Helix as a Minecraft skin, but because of certain limitations, this is the size a minecraft skin has to be if you weren't aware........
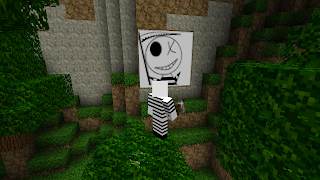
Well its not that bad, but I do prefer my current skin, which I didn't make and do not know the original creator, For all those that don't know from the uncanny similarities, it is
"小早川ゆたか, Kobayakawa Yutaka", from the slice of life Japanese Anime "Lucky Star".

So moving on, I actually don't build much in Minecraft these days, because I'm not very good, I prefer to just tunnel my way for hours with no real point, I have a feeling my mid-life crisis is going to come a little bit earlier than expected.

Although I have had a project on hold for a while that I am doing with a friend.


Yes that's right Starbug, and to be honest, most of the work was my friends, it's not really that big of a project that 2 of us can work independently, and will/might probably finish it before summers over.

The only other thing "Productive" that I have done that isn't watching anime or playing games is my new Email signature for my GMail account it has links and everything. Although I think Blogger is going to put boarders around each sliced image, so I don't think it will look right, but I'm not going to fix it.


Well goodbye and I'll see you next month.

Saturday 30 July 2011

Im Still Alive

OK now, the few that actually read my blog, if any...well done and this post is just to let you know that I have finished college and am on a longgggggggg holiday, so no more posts until I feel like it, but I am available on:

Also find me here: Myanimelist.net and here: Youtube.com
I almost always use Mastahelix as an ID, so look for that.

I might possibly upload some random stuff later on.

Thursday 16 June 2011

Music, yes not quite finished

Well I wasn't planning on doing a post on my musical experience as there wasn't much to write about, but to achieve a good grade I had to produce something.

I used the basic free music editing software Audacity to edit our voices and original music which where recorded at the colleges sound room using very expensive stuff and not free software CuBase.

And here it is hosted by Esnips, edited by yours truly with voices from Harrison, Keiron, Joe and Me, the music composed by someone and played by Joe and Robin.
The music and voice overs where recorded separately and edited, and finally pasted together, I used Audacity to reverse the original track for variety instead of titling the track and by changing sound levels, tempo and pitch I was able to get the voice overs to sound better.

Wednesday 18 May 2011

Take 15 - My environment

Almost finished, and the hardest part, Rendering. Yes that's right rendering an animation with particle affects is hard as the render time for my computer was about 220 hours which is ridiculous and because the holidays where coming up I didn't have the time to render the scene at college so I had to work with it. I instead decided to f*ck that I own a laptop and you cant leave a laptop on for 10 days, so I had to edit the scenes slightly, and because of this the final render is a last minute rush, which is disappointing but I hopefully still got a distinction so it doesn't really matter.


This render is the same one I used in my previous post, it is just the camera following the line without the model trains particle effect. Time to render "5 Hours"


This render is only the beginning of the animation where the portal animation meets my computers CPU capabilities. Time to Render "6 Hours"


After watching the first render I found that the animated sky box was to fast, so I fixed it and re-rendered it. Time to Render "6 Hours"


This render is of a camera on a separate path constraint which has the train in shots, the particle effects are only in shot for about 5 seconds.Time to Render "7 Hours"


The final render is of the exit portal, I spent more time on this than any other part, and was able the get the animation to run smoother, to get it to render fast I deleted everything that wasn't in shot and it rendered a lot fast than the estimated times. Time to Render "8 Hours"

I also edited some train onomatopoeia but I didn't think that was enough to make a post about, the editing was done by Steven "Self proclaimed Genius" Dickinson, he did a wonderful job at editing all mine and the teams videos into a serviceable trailer. (See Below)


The sound used is "Zack Hemsey - Mind Heist" and Jupiter by Paul Collier

Thursday 12 May 2011

Take 14 - My environment

Hello there, the next documented part of my work, is the animation path for the model train.
I first had to group a light and camera to my model and attach that group to a line which is designed to go where I would want the train to.
I first had to change the alignment of the group to path contract through the motion tab in 3DS Max and add the line as the path.
To get the train to follow that path now the group was attached to the line, I just checked the option follow and realigned the group so it animated how I wanted it to.


The video is from the camera perspective following the line. The only problem with this method is that every time I ungrouped the selection I had to re-do the path constraint.

Thursday 14 April 2011

Take 13 - My environment

Now the time to merge my teamfriend's portal and train, which for once actually merged without problem.
So A bit of scaling and the train and portals where ready to be placed, I had to change the portals animation to only animate when the train is in view of the camera.


I deiced to also create and merge a arena that would host the portal on top of my hill and this is what I came up with. (Below)
I created the arena from copying and pasting cuboids with bend modifier's on them, I then used my old friend the symmetry modifier which allowed me to only create one side of the model.This is the Arena with a different opacity texture and it is unknown if I will change it.

Take 12 - My environment

I thought it was time to create more buildings for the Ruins of Eoel, and so I quickly made them.

Well I did say quickly, I made it by creating and them extruding a cylinder and after converting it to an editable poly, I cut a hole in it to represent a door and placed a Noise modifier on to give it a more ruined look.

The second building was a house and I created the side from cubes and after the same repeated steps as the watchtower, I just scaled the cube to look more the part. The sticks are cylinders with the same, yeah you guessed it's a Noise Modifier.This is a test render of the merged buildings with a texture on, which I use quite a lot with a UVW Map modifier to fit the texture nicely. The church and castle from my previous work where added as well. Oh and I've decided to make no more buildings, because I don't watch to over crowd the small area.

Take 14 - My environment

Now part two of the looping animation, and the hardest, importing the loop, and to make a story short it didn't work and even though i copied every value from the merged f*cking original to recreate the effect it still refused to work, so I basically thought f*ck it and kept what I had
I copied the loops about 12 times and managed to get a render done, the videos below is a test to see the loops in action. I hid everything apart from "Helpers", which included my sun.


Only after rendering I noticed the animtion it looped wrong and have fixed it.

Monday 11 April 2011

Take 11 - My environment

The next step for my environment was some sort of animation in the background of my main one, and I decided to go with a light representing a soul, which would loop in circles, I would have about 10 of them so my environment didn't look static.First I had to creat an gizmo so I could place a fire effect on it, I did this by going to the Create tab on the menu and then; "Helpers>Atmospheric Apparatus>Sphere Gizmo" I then created a 2D circle and had the gizmo follow it by putting a path constrain on the circle and then adding my gizmo.
The next stage was placing a fire effect on the gizmo, I did this by basically selecting the gizmo and adding a fire effect through the add effect menu, I played around with the values and then rendered it.

Here is a render of the effect, the final step was to loop it, and to do this I went to the Window menu and followed this path; "Graph Editor>Curve Editor", I then selected the gizmo,"Controller>out of Range Types" and finally selected the loop option.

This is the final product just need to open it with my environment, what could possibly go wrong?

Take 10 - My environment

Hello there I'm back doing my enviorment for my final project, and today I didn't make trees.

It would be a lie to say I created the trees, because I didn't there inbuilt models in 3DS Max and I didn't see the point in making my own when these ones are staring me in the face. by going to the create tab on the menu in 3DS Max and then "Geometry>ACE Extended>Foliage", it enabled me to create a tree or foliage as they call it from a selection.
After scaling the tree I wanted to fit into my environment, but because my environment is a fantasy themed one I didn't want the default texture I wanted a weird yet wonderful fantasy themed tree, I then accidentally moved my environment map on the tree instead of another texture I had previously created, and above is the result. I kind of liked it and decided to keep it.Here is part of my environment with some more foliage to give it a more realistic look, sort of?

Friday 8 April 2011

Randoms - A mask?

And i'm back with random shit, I mean stuff, well I thought I'd have a go at making a face, but being me I decided to alter my model more than it would allow me to undo in 3DS Max, I found that you could change how may times it allows you to undo, but only after I had desecrated my face model to look like a sort of alien mask thing.

The face was originally a sphere that I had converted to an editable poly, and extruded a few vertexes and edges until it looked like a face, I wasn't using a reference image as I already know what a face looks like, as I have one, a face I mean. And I basically added a symmetry modifier after I deleted half the model, so I only needed to worry about half the model and a turbo smooth with an literation of 2 to well, guess.
I accidentally deleted and extruded the base and the turbo smooth made it look like what it is, so I just tidied it up and went with it. I added to holes for eyes and thought what the hell its a mask.

Sunday 27 March 2011

Randoms - A smiley mouth

Okay, now I have finally got a proper legal copy of 3DS Max,...Yeay. It turns out Autocad are giving there software away for free to students, which I didn't know,..I do feel pretty stupid.

So I decided to have a go at modelling a face, but the tutorial I was using stopped at the mouth, and because I am a little bit proud at my mouth, I thought I'd show it off anyway.


First I found a reference image that contained a front and side view of a face, and imported them on a plane, to work from. To create the shape I used a cylinder and matched the area of the shape to my reference image's mouth. I then went on to delete most of the faces, so I ended up with a 2D doughnut shape. And then after a bit of modelling, I just moved a few vertex's and edges, I deleted half of the shape and instead put a symmetry modifier, so I only needed to work on one side.
I hid the reference images so I could see the model and I also put a turbo smooth modifier on so it looked, well, smother.
I then un-hid and froze the reference images so I couldn't select them but I could see them so I could model the mouth better and more accurately, I used the short cut Ctrl+X to make the mouth opaque so I could easily match to model to the reference images.And here is a mouth, to make it more life like I turned the literation's on the turbo smooth modifier up to 2.

Friday 18 March 2011

My Babies

As a team we had to decide on who would create what promotional things, I was chosen to create the poster and box art for our game, others where chosen to do T-Shirt and Mug design, splash screen for the trailer, etc. And first I had to create a logo for our game and at first I thought just the title with some smudging would be enough, but in the end I designed a little image to represent the game it is a train going through a portal.
Above are just our logos with Japanese and Russian translations of our title for no reason whatsoever, I don't even know if it is correct as I used a translator, I don't speak Russian or Japanese

My first baby is the promotional poster, after researching other posters for game releases, I found them to be incredibly simple, and so I used a render of our portal, courtesy of Luke who made it, and the iconic words of the gaming industry "Coming Soon", I also added logos to add realism to the poster. I found most posters to be black and because our game has a dark setting I chose to use black as the background and inverted our game logo to white.
The one I'm most proud of is the box art, it did take a while to complete, as I was waiting for screenshots from my team members to put on the back cover. I would like to stress that every image is originally made by me or either my team, the bar code, ESRB logos and PC DVD-ROM are the only images that where not created by us. The brushes used in Photoshop where a Crack, Decay and Trainline, for the background, The system requirement information are copied from "Devil May Cry 4", to add realism, all other information was originally written by me.


Here is my beauty on display, there are changes that I would make, I would lower both the ESRB and Intellectual Arcade logos on the front, and change the front text under our game logo to make it clearly visible.


I might also add that because on the poster, I advertised the "Games for Windows" logo, I might also add that to the cover instead of the current PC DVD-ROM logo.

Take 9 - My environment

Fed up of 3DS Max I think I'll take a little break and post my planning instead, technically its not planning, as I drew these after I created the environment, but that's because my actual planning looks nothing like my environment.
Now the only thing that didn't change was the foundations to a castle and a church which I re-drew, as my original plans where made in computer space, using Photoshop and that's not really aloud as I was told I had to have some drawings.

Now if you can see this one, well done, but it is in fact a drawn birds eye view of my current environment, it is also labeled, and I purposely made alterations so I could comment on them in my evaluation. (Hehe)

Here's another one of my masterpieces, a fully coloured perspective view of my 3D environment, it makes you wonder doesn't it, why I'm in a games course wasting my talent.